How to Throw a Block Party

Source:  http://www.tasteofhome.com/

In this busy age where we run to work, school and extra-curricular activities, you may be home hardly long enough to see your family much less your neighbors.Block Party
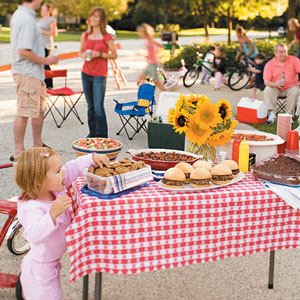
One great way to connect with your neighbors is by planning a potluck block party. Instead of firing up the grill for ordinary hamburgers, make one of our Top 10 Burger Recipes.

Busy families need potluck salad recipes and potluck side dish recipes that can be easily assembled ahead of time. Try our crowd-pleasing Tossed Salad with Lemon Vinaigrette or Ground Beef Baked Beans.

Kids of all ages won’t be able to keep their hands off of richly decadent Blond Butterscotch Brownies and scrumptious Chocolate Chip Oatmeal Cookies or one of these other potluck desserts. (All recipes are shown at right.)

Block Party Plan

Start getting to know your neighbors even before the party begins by forming a block party committee.

Go door to door to visit your neighbors with a flyer for the party. Explain to them about the party, ask them if they think that they will be able to attend and if they would like to be on the committee.

Take a sign up sheet along asking the following questions:

  • Family name
  • Address
  • Phone
  • Email
  • How many people will attend, names and children’s ages
  • How they can help
  • What food would they like to bring
  • Do they have any special equipment available for use? Tables, chairs, tents, etc.

Not only will working together make the party easier to organize, you’ll make some new friends in the process. Have one person act as the main contact person, then assign other groups to handle the following:

  • Permits and other legal requirements. Many communities require a permit for block parties. Determine an alternate parking area for people who live in the section of the street where the party will take place.
  • Food and refreshments. Potlucks are an easy way to make sure there’s a variety of tasty fare at your block party. To keep from having a buffet full of chips or desserts, circulate a sign-up sheet with assigned categories such as salads, veggies and desserts. For the main course, charge a per-person fee and purchase grill meat or have each family supply their own.
  • Activities. Bicycle decorating contests, scavenger hunts, relay races…the sky’s the limit when it comes to planning the fun and games for your neighborhood block party. To make sure both the young and young at heart have a good time, include a variety of activities that appeal to a wide age range.
  • Set up and clean up. Think about music, decorations, plates, cutlery, napkins. Have a potty talk—determine if people will use the restrooms at their home or rent a portable restroom.

More Seasonal Recipes:

Summer Entertaining >

Top 10 Burger Recipes >

Potluck Salad Recipes >

Potluck Side Dish Recipes >

Potluck Desserts >

Memorial Day Recipes >


Leave a comment

Filed under Block Party

Grilled Picnic Taco Nachos

food, Grilled, recipe, Taco Nachos, Tailgate, picnic

Ultimate Tailgate Connection

Source: http://www.tablespoon.com/

Grilled Picnic Taco Nachos

Keep the heat outside with munchy nachos. A foil pan takes them from grill to picnic table in just minutes.

Prep Time15 min
Total Time15 min
Servings4
Ingredients
5 cups tortilla chips
1 can (15 oz) Progresso™ black beans, drained, rinsed and mashed
1 can (4.5 oz) Old El Paso™ chopped green chiles, drained
2 teaspoons Old El Paso™ taco seasoning mix (from 1-oz package)

2 plum (Roma) tomatoes, chopped

2 medium green onions, sliced (2 tablespoons)

2 cups finely shredded Colby-Monterey Jack cheese blend (8 oz)

Directions

  • 1Heat gas or charcoal grill. Spray 12×18-inch foil pan with cooking spray. Spread tortilla chips in pan.
  • 2In medium bowl, mix beans, chiles and taco seasoning mix; spoon evenly over tortilla chips. Top with tomatoes and onions. Sprinkle with cheese. Cover pan with foil.
  • 3Place foil pan on grill over medium heat. Cover grill…

View original post 13 more words

Leave a comment

Filed under Uncategorized

Beads of Paradise

Source:  http://spoonful.com

Lifesaver jewelry

Total Time 1 hour
Ages school-age

Make your jewelry and eat it too! All you’ll need for this cute make-and-take party favor is some elastic cord and a rainbow of LifeSavers candy.

What you’ll need

LifeSavers candy

Elastic cord

How to make it

  1. Measure the elastic cord around your wrist, allowing an extra few inches for the knot.Lifesaver jewelry 2
  2. Simply thread on the candy; we alternated between regular-size and mini LifeSavers.
  3. When you’re finished, tie the two ends of the elastic with a double knot. And remember, no sampling your new bracelet before you try it on!

Leave a comment

Filed under Things to do with the kids

39 Awesome Grilled Burgers

Source: www.delish.com

Fulfill your every burger craving, from basic beef to spicy pork to smoky mushroom and herbed seafood, with this go-to collection of juicy burger recipes.

Find the solution to all your burning barbecue questions with our tips for better grilling, plus find our favorite recipes for grilled chicken, seafood, and steak.

Leave a comment

Filed under Recipes

Potluck party

PotluckPotlucks need to make a comeback… so why not host one? You’re saving on the cost of going out on the town and/or footing the entire bill for having a party. And you’re getting to try out new recipes. How’s that for a tasty tip?

Leave a comment

Filed under Meeting Ideas, Potluck, Uncategorized

Classic Potato Salad

Source: americanfood.about.com – By , About.com Guide

Getty Photo - About.comPotato Salad – Getty

Move beyond the mayonnaise potato salad from the deli counter and try this easy, homemade version. It’s so much better when homemade. I’ve added some chopped dill pickle and a little white horseradish1 to the dressing to give it a flavor lift. One tip for the salad is to be sure to add the dressing while the potatoes are still warm so they absorb more flavor.

Prep Time: 20 minutes

Cook Time: 15 minutes

Chill: 1 hour

Total Time: 1 hour, 35 minutes

Yield: 8 servings

Ingredients:

  • 2 pounds small red-skin or Yukon Gold potatoes, scrubbed
  • 1/2 cup sour cream
  • 1/2 cup mayonnaise
  • 1 tablespoon Dijon mustard
  • 1 tablespoon prepared white horseradish2
  • 1 tablespoon dill pickle juice
  • 1 teaspoon sugar
  • 1/2 teaspoon salt
  • 1/2 teaspoon ground black pepper
  • 2 small cucumbers, halved lengthwise, seeded, and thinly sliced crosswise (1 1/2 cups)
  • 1/2 cup chopped green onions
  • 1/3 cup finely chopped dill pickle

Preparation:

1. Bring a large pot of water to a boil. Add the potatoes, cover, and cook over medium heat for 12 to 15 minutes, or until firm-tender. Drain and let cool until warm.
2. Meanwhile, make the dressing: In a large serving bowl, whisk the sour cream, mayonnaise, mustard, horseradish, pickle juice, sugar, salt, and pepper until well blended.
3. Stir in the cucumbers, green onions, pickle, and warm potatoes. Gently toss to mix and coat. Cover and refrigerate for at least 1 hour for the flavors to develop.
4. Serve the potato salad chilled or at room temperature.

Recipe Notes

• Prepare the potato salad and refrigerate it in an airtight container for up to 2 days ahead. • Potatoes of equal size will cook in the same amount of time. Cook potatoes for a salad just to the firm-tender stage. Overcooked potatoes will absorb too much of the dressing and become mushy. • When selecting potatoes, choose those that are fairly clean, smooth, and firm. Do not select ones with wrinkled skins, soft dark spots, cut surfaces, or green areas. Green spots mean they have been exposed to light; cut the spot off before cooking to eliminate bitterness. • Potatoes are more fragile than you might think, so handle them carefully to prevent bruising. Keep them unwashed in a cool, dark, well-ventilated place. If stored in a place that is too hot, the sugar will convert to starch and the potatoes will lose their natural sweetness. • Potatoes with a low-starch content are recommended for the potato salad because they will hold their shape in a salad. Low starch varieties include the blue of purple, Yukon Golds, red-skin and fingerlings. • Add a can of drained tuna or salmon, drained kidney beans, black beans, or chick-peas, or ham chunks to the salad for a heartier version of this potato salad. • For a colorful version of this salad, use a mix of small blue potatoes, red-skin and Yukon Gold.

©2012 About.com, Inc., a part of The New York Times Company. All rights reserved.

Leave a comment

Filed under Classic Potato Salad, Recipes

Fire Roasted Peppers

Source: bbq.about.com -By , About.com Guide

Red Jalapeño Chilies – Regarding BBQ Inc.

Roasting chilies and peppers adds a smoky flavor that can enhance any recipe or be served as an appetizer or side dish. Many people buy roasted peppers and chilies in cans, but it’s so easy to do and the flavor is so much better, that you really should roast your own. Though you can use a lot of different cooking equipment to roast a pepper it is best done over a live fire, like that from your gas or charcoal grill.To roast a pepper, start with a hot fire and whole, washed peppers. Place them over the fire, turning frequently, until they are charred and blistered on the outside. They won’t look to edible but the black stuffs coming off in a minute. Take the peppers or chilies from the fire and place immediately in a paper or plastic bag. Close the bag and let them sit for about 10 minutes. The heat from the grill and the moisture from the pepper will sweat the skin loose. After the ten minutes are up, remove the peppers from the bag and scrap the black off with a kitchen knife. It will be messy, but the skin should come off easily. Once the skin is cleaned off, cut the pepper open, remove the stem and the seeds from the inside and you’re done.

Of course it’s important to remember that peppers can be hot and roasting them can release the capsaicin (the stuff that makes hot foods hot) and so be careful handling them. In fact, be careful roasting them as well. Roasting peppers can release capsaicin into the air while cooking. Use rubber gloves or be sure to wash your hands thoroughly after you have handled the chilies. It is also important to use fresh roasted peppers and chilies soon. They can be stored in the refrigerator for a day or two, but they are best freshly roasted. Also, washing the peppers after you have scraped of the skin will cause them to lose some of their flavor, so if you want to hold on to the heat, keep them away from the water.

Fresh fire roasted peppers and chilies can be substituted in any recipe that calls for peppers. The addition of the smoky flavor will add to most any recipe. They also make a great appetizer or the base for a fresh salsa, so try roasting up some peppers next time your in the mood for a flavor with bite.

©2012 About.com, Inc., a part of The New York Times Company. All rights reserved.

Leave a comment

Filed under Fire Roasted Peppers, Vegetables

Dr. Pepper Barbecue Sauce

Source: www.epicurious.com – by Elizabeth Karmel Soaked, Slathered, and Seasoned 

yield: Makes 5 cups
Good for Slathering: Pork; beef; duck; ribs

My students make this barbecue sauce every month in my Southern-barbecue classes. It is the only red sauce that we make in the class, and we always double the recipe because the class slathers it on everything! This sauce has been printed in many places and thousands of students have the recipe, but I couldn’t write a sauce chapter and not include it here. The Dr. Pepper gives this sauce an edge over most basic sweet barbecue sauces.

Ingredients
  • 4 tablespoons (1/2 stick) unsalted butter
  • 1 large yellow onion, chopped
  • 4 cloves garlic, chopped
  • 1 cup ketchup
  • 3 tablespoons tomato paste
  • One 12-ounce can Dr. Pepper
  • 1/2 cup cider vinegar
  • 1/3 cup Worcestershire sauce
  • 1/2 cup packed dark brown sugar
  • 2 teaspoons ancho or New Mexican chili powder
  • 1 teaspoon fine-ground white pepper
  • 1 teaspoon kosher salt
Preparation

1. In a heavy saucepan, melt the butter. Sauté the onion and garlic in the butter until translucent, about 10 minutes. Add all the remaining ingredients and simmer for about 15 minutes, until the flavors have blended. Continue cooking until the sauce begins to thicken, 20 to 30 minutes. Taste and adjust the seasonings with salt and pepper if desired. Remember, the ribs will have plenty of spice rub on them, so don’t overseason the sauce.

2. Let the sauce cool for about 10 minutes or until it is warm but no longer “boiling” hot. Puree with an immersion or traditional blender—this will make the sauce thicker. Let cool. The sauce will keep, tightly covered, in the refrigerator for up to 2 weeks.

3. Brush it on food 5 to 15 minutes before the cooking time is finished. If desired, serve extra on the side.

Read More http://www.epicurious.com:80/recipes/food/views/Dr-Pepper-Barbecue-Sauce-353269#ixzz1ndQyFtrF

1 Comment

Filed under Recipes